A naukri.com initiative
Dev
2w
220
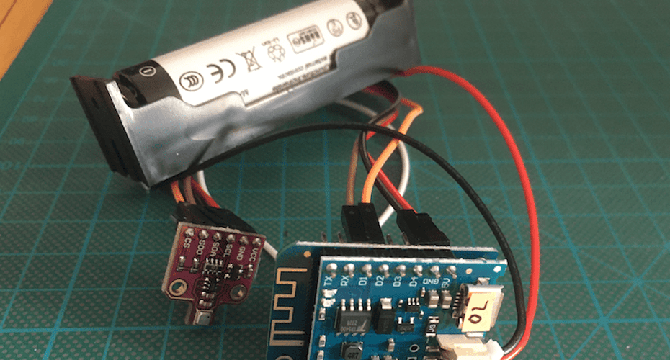
Image Credit: Dev
Home Assistant: Measuring Air Quality, Humidity and Temperature with a BME680 Sensor
- Building an IOT sensor using ESP8266 and ESP32 boards can be done by starting with a basic sketch and adding IOT integration, or using integrated systems like ESPHome or Home Assistant.
- Integration with Home Assistant can simplify the process of connecting sensors like the BME680 to ESP8266 boards, providing barometric pressure, humidity, and temperature readings.
- Ensure sensor and board compatibility before purchasing to avoid compatibility issues with Home Assistant.
- The article details the steps to connect a BME680 sensor to ESP8266, write necessary code for sensor data, and integrate with Home Assistant dashboard.
- Hardware needed includes ESP8266 board, BME680 sensor, and Dupont cables for wiring.
- Wiring the BME680 with the ESP8266 using I2C connections involves connecting Vin, Ground, SCL, and SDA pins accordingly.
- Setup in ESPHome requires defining board configurations, I2C setup, selecting bme680_bsec for CO2 concentration and Air Quality Index, and specifying sensor and text_sensor entries.
- Flashing the ESP8266 can be done by directly connecting to the computer or using external tools like esphomeflasher, ensuring successful upload of firmware.
- Troubleshooting steps include checking wiring, deep sleep mode settings, correct sensor address (0X77 or 0X76), reading logs, and resetting the device if needed.
- Configuring the BME680 sensor data in Home Assistant is simple, requiring adding a new card from entities to display the sensor readings.
Read Full Article
13 Likes
For uninterrupted reading, download the app